Freeform Block of the Month – Month 1

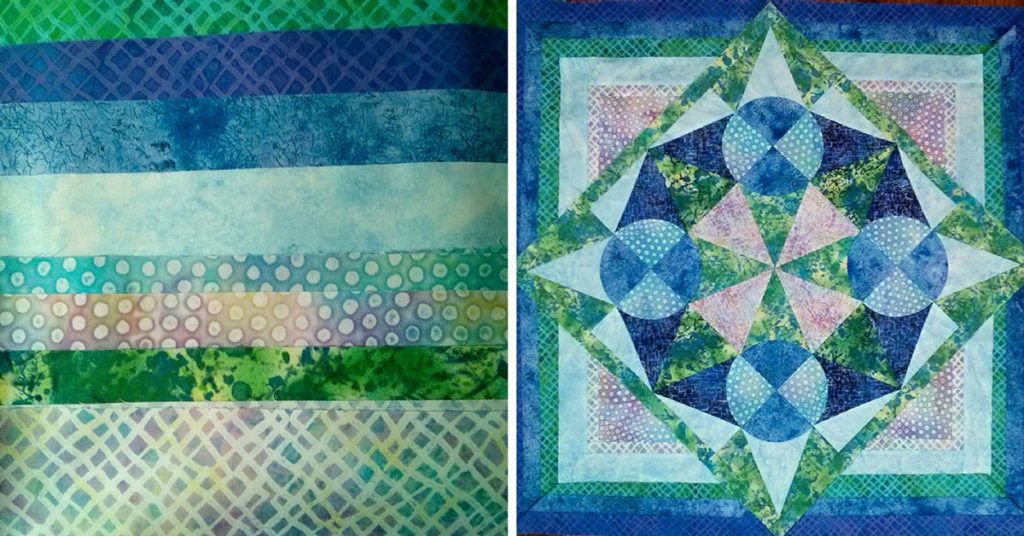
Oh my gosh, I’ve survived my first month of the Freeform Block of the Month project! I’m so pleased. I’ve already got all my blocks sewn and I can’t wait for the next shipment! In this first month, we made the Uneven Nine Patch Blocks and Compass Blocks that surround the center medallion, shown in the quilt photo below. Everything went pretty smoothly, and I’ve already made the pattern my own by switching up the color placement in one of the blocks. I’ll tell you all about it.
I knew that this quilt was going to be pretty, but I was really jazzed to see the fabrics up close. They are so cool! They have an almost retro 1980s look, with spatter prints and fun, graphic prints in pretty, cool greens and blues with a nice pop of soft pink. Once I unpacked the fabric and pressed it, I read through the directions to make my plan. I decided to sew the Uneven Nine Patch blocks first since they’d be quick and easy, especially if I strip pieced them.

Unpacking fabric and reading instructions to make my plan
The instructions call for sewing patches together to make the blocks, but there is just enough fabric provided if you want to strip piece instead. So that’s what I did (be aware that there is no room for cutting errors if you decide to go this route!). To strip piece the middle units, I cut 1 green strip 4.5″ wide and 2 pink strips 3.5″ wide, stitched them together to make a band, and cut 8 middle units at 4.5″ wide.

Making the middle units for Uneven Nine Patch blocks
To strip piece the side units for the Uneven Nine Patch block, I needed one and a half width of fabric bands to make all 16 units, so I cut 2 pink strips 4.5” wide (using just half of one strip) and 3 green strips 3.5” wide (one of these strips cut in half can make the half band). I made 1.5 bands and cut them into 16 units 3.5” wide.

Making the side units for Uneven Nine Patch blocks
Then I just sewed the units together to make the blocks. Chain piecing makes that process even faster, and I completed all 8 Uneven Nine Patch blocks in just an hour or two. Easy peasy!

Chain piecing makes quick work of the blocks!
Then it was time for the Compass blocks. I decided to switch up the values on these blocks to give the project a personal twist, so the navy and light blue are swapped in my version. There’s no getting around the fact that curved seams are fiddly and take a lot longer than straight seams. You have to prep the patches, pin the seams and sew slowly, making sure that the fabric behaves and doesn’t stretch, distort or get folded into the seam. The BOM instructions come with a nice photo tutorial for curved seams but if you want a little more in-depth instruction, I made a short, free video about curved seams a while back (watch it here). I used the exact same techniques to sew the curved seams for the Compass blocks.
When pinning the curved patches together, I pinned with a ¼” offset so the unit would be as accurate as possible, and would join to the adjacent patch easily. With these particular templates you don’t align the raw edges of the patches so it’s nice to have a general guideline for pinning. It worked pretty well.

Offset the seams for nice curved units
For sewing the curved seams, I must recommend using an awl or a stiletto of some kind to keep the raw edges aligned as you sew. I like the Steady Stiletto from Steady Betty, but any will do. It’s very helpful to have a tool that can hold the fabric close to the needle and using your finger for this purpose is just too dangerous. Sew slowly, making sure that the fabric stays aligned all the way through the seam. No matter how much practice you have with curved seams, you still have to go slow and stay vigilant. Curved seams get easier with practice, but they probably won’t get much faster no matter how many you do.

Use an awl or a stiletto to help with curved seams
Once the curved seam units were done, the rest of the blocks came together nice and fast. And now I’m done! I’d said in the introduction to this project that I would try and do some work on it in the evenings, but that didn’t really happen, so I essentially did everything in two weekends. Not bad! I hope the coming months have installments that are just as fun and easy. Here’s what my blocks will look like when they border the center medallion. Notice the difference in value, where I swapped the navy and light blue patches in the Compass blocks. It’s probably going to affect some of the design decisions down the road, but that will be a fun adventure when it comes!

The medallion will go in the middle of these blocks
But wait! Since I’ve already personalized the pattern, what if I take it a step further and swap the placement of the blocks themselves? It’s hard to say without seeing them in the context of the whole quilt, but this could definitely be an interesting twist. I’ll decide for sure when I get a few more of the blocks, and probably that center medallion, done and on the wall too.

Maybe the block placement will be changed too, who knows?
So far I’ve kept to my goal of not falling behind, and I really hope to keep it up throughout the entire project. Wish me luck! Have you signed up for this Block of the Month? How is it going for you so far? Do you have any words of wisdom to share with me about it? If you are interested in signing up, check out the project details here . I’m having a great time so far—the Paintbrush Studio fabrics are beautiful and the blocks are varied and fun to make. I can’t wait for the next fabric bundle to arrive! I hope you’re enjoying it too, if you’re joining in!
Happy quilting!
Gigi
![]()


Where can I purchase the template set for Compass quilt BOM
Hi Judith,
The Fons & Porter Compass Template Set is available in the store. Here is a link to the page: https://www.quiltingcompany.com/store/fons-and-porter-compass-template-set
Best,
Brenna
The Quilting Company Team