An Easy Quilt Binding Technique for Small Quilts – Quilting Daily
I will be the first to admit that quilt binding is not my favorite part of the quilt-making process. I understand that binding a quilt frames it and, done correctly, enhances the design of the body of the fiber art piece. And of course, if you’re going to use a quilt (rather than hang it on a wall), binding a quilt is necessary.
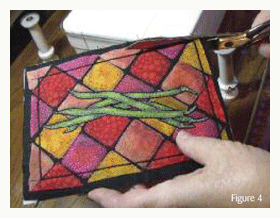
| Terry Grant shows how to bind a quilt when it’s small (and get a neat result) on “QATV” Series 600. |
But to me, binding a quilt is more tedious than creative–and I have a lot of UFOs to prove it!
Fortunately, my smaller art quilt projects can be finished off with a fused binding, zigzag stitching, or no binding at all.
Very small quilt projects pose their own binding issues. A wide binding can overwhelm a small project. But it can be difficult to create an even zigzag or satin stitch that doesn’t get wonky somewhere (especially at the corners).
Quilter Terry Grant has a clever way to bind a small quilt that is easy, neat, and not tedious. You’ll need perle cotton floss and matching machine thread, a handsewing needle and heavy-duty thread, a ruler, and a permanent marker, plus your sewing machine.
How to Bind a Small Quilt (adapted from “QATV” Series 600)
1. Start by making the piece larger than you intend the finished size to be. I like to start with a piece that is 1⁄2″-1″ bigger in each direction than the finished size.
2. After the piece is quilted, use a ruler and a permanent marker to mark the final size on the top of the quilt.
3. Leaving approximately a 1⁄2″ of floss loose at the beginning, lay a piece of perle cotton on the marked line and zigzag over it. Use a narrow zigzag that just covers the width of the perle cotton. By doing this before you cut the edges off, you can get it nice and smooth, with neat corners. TIP: It’s best not to start and end at a corner. The start and stop are less noticeable along one of the sides.
4. When you get back around to the start of the stitching, cut the perle cotton so the end butts right up to the start and then stitch over it, taking a few extra stitches beyond the start. The raw ends will be virtually invisible.
 |
| ‘Green Beans’ quilt by Terry Grant. |
5. Next, carefully trim the excess fabric off, as close to the stitched perle cotton as you can get without cutting the stitching. If you happen to snip 1 or 2 stitches, don’t worry. Small errors will be covered later.
6. Using a hand-sewing needle threaded with a heavy-weight thread (I use buttonhole thread), take just one stitch through each corner of your piece. Cut the thread off, leaving 2 long tails at each corner (each about 3″ long). These thread tails are going to prevent the problems that often occur when you stitch around corners.
7. Zigzag over the perle cotton and the edge again. As you approach a corner, grab the thread tails and use them to guide the stitching up to the corner. Stop, with your needle down at the corner, pivot, and use the thread tails to pull the corner gently toward the back, under the foot, while you smoothly stitch into the next straight side. When you are finished, you can just pull the thread tails out and discard them.
Terry demonstrates her technique for how to bind a quilt on the 600 series of “Quilting Arts TV” and also in this free guide to binding and finishing (along with four other great techniques). If you’re looking for advice and ideas for how to bind a quilt, create surface designs, improve your stitching techniques, designing a quilt, and more, “QATV” series downloads will solve your problems and inspire you.

P.S. Do you enjoy adding a quilt binding or do you see it as a chore? What is your favorite way to bind a quilt? Leave your comments below.
-
Quilting Arts TV, Series 600 (Video Download)
Could this be our best season ever? In the sixth season of “Quilting Arts TV,” …


Join the Conversation!