I Love This Quilt!: Santa Fe Sunrise
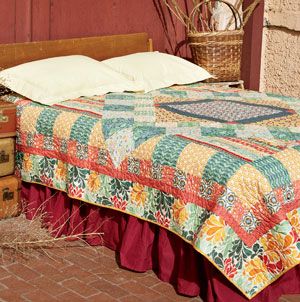

Santa Fe Sunrise by Sarah Maxwell and Dolores Smith
Have you looked through the new McCall’s Sept/Oct 2017 issue yet? On the last page, I talk a little bit about how I love the quilt Santa Fe Sunrise, deigned by Sarah Maxwell and Dolores Smith. I think this pattern has so many possibilities for customization, just by switching up the fabric choices. So I decided to make a version of this quilt that is as different as possible from the original. Let’s see how I did! But first here’s a reminder of what Santa Fe Sunrise looks like. You can also click on this link to download the pattern for free, so you can make your own version.
This quilt is constructed from the center out, so that’s how I started planning. The first exciting part of my plan was realizing that the center square finishes at 18″. I have quite a few blocks on hand that I’ve designed and made for other projects that finish at 18″. So I decided to use a block I’d already made for that center square, rather than using yardage. It was a fun choice that would definitely affect all subsequent design decisions.

Birdy block that finishes at 18″. Designed and made by Gigi Khalsa.
Once the center square was decided, I had to figure where to go from there! I had a few panels from Hoffman featuring beach scenes that were thematically and chromatically consistent with the center square. The style of the prints are very different, but I figured I might be able to fussy cut my way around that.

Block with some panels and ombre prints
I was happy with the way the fabrics looked together so I started cutting. I had two of the panels on the left (I call it the serene one) and three of the panel on the right (This one I called dramatic), so I could definitely fussy cut around to get the colors and effects I wanted.

Building the center medallion.
You can see that the top and bottom triangles don’t quite match up but it actually worked out great. One thing I really appreciate about this pattern was how the center medallion is trimmed to size before the pieced borders are joined. You can kind of see the line I marked for trimming. I needed to fussy cut all those big triangles to achieve the effect I wanted, rather than cut one big square and divide it into triangles. So the top and bottom triangles are a bit smaller than the pattern recommends, but large enough to get what I needed and still have a bit extra for trimming to size. Then it was time to plan the pieced borders!

Center medallion with pieced borders.
And plan I did! I basically cut up the remaining ‘serene’ panel and one of the ‘dramatic’ panels to get most of the squares in the borders. The corner stripey squares are fussy cut from the panels from Robert Kaufman’s Vivid collection. I also have a few space-print squares cut from the Artisan Spirit Expressions panel from Northcott. I’m realizing I used a lot of panels in a very non-panel-y way to make this quilt!
Next are some more large triangles to be placed on each side of the diamond, along with some more piecing. I fussy cut the triangles again, to achieve a specific look.

Growing quilt!
You can see how I had to introduce yet another print for those bottom triangles. Even though the print is very graphic and nothing like the photo-realistic panels, the colors were just right in my eyes and I decided to make it work. The big space print triangles were perfect for the top. The surrounding squares are more patches fussy cut from the panels. I have a few randomly sized patches left over from the panels, but I’ve pretty much used them all up at this point. And this is where I am now.
I’ve got to finish cutting the small squares for that outer border area, and I have a pretty good idea of what’s going there though it could change a tiny bit. The big thing I’ll have to consider next is what the heck I’m going to do for the final borders. I have a few ideas but nothing is for sure yet, so please stay tuned! I may have to do some piecing in the borders to continue the flow of color and stick with the theme.
I think it’s pretty wild how different my version looks from the original quilt! It’s the exact same pattern, besides that center square. I love it because I had an vague, kind of out there aesthetic in mind that I wanted to explore, and this pattern gave me a structure in which to do that. The piecing is pretty standard and the pattern is easy to follow, so all I had to think hard about were my creative choices. The large patches and the wonderful way they’re arranged gave me lots of creative freedom for personal expression; I really do love this quilt!

Join the Conversation!