Nancy’s Quilting Classroom: Choosing Quilting Designs, Part 3 – Fons & Porter
In Choosing Quilting Designs, Part 1 and Choosing Quilting Designs, Part 2 of this 3-part series about hand and machine quilting designs, I discussed using allover designs (Part 1) and choosing quilting designs to enhance individual quilt blocks (Part 2). To wrap things up in Part 3, I’ll talk about quilting borders.
When I’m quilting an allover design, I might stitch an edge-to-edge design, disregarding the border lines; or, I might stitch the allover design in the center of the quilt and stitch a different design in the borders (see Part 1 for examples of both options). My decision of whether or not to quilt the borders separately depends on the quilt design, the width of the border, and how many borders I added to the quilt.
However, when I’m choosing quilting designs to enhance quilt block designs, I always chose a quilt design for the border. There are lots of options for border quilting designs, including straight lines, using a quilting stencil, and creating your own design. Before choosing a design, I ask myself the following questions:
1) How densely is the center quilted? The density needs to be consistent throughout the quilt. If there is more quilting in the center than in the borders, the borders will not lay flat and, vice versa.
2) Do I want to add a new quilting element or repeat one already used in the quilt block design?
3) How many borders were added to the quilt?
4) How wide are the borders?
5) How much time do I have?
")


For “Fan Dance” from Love of Quilting March/April 2012, again, I didn’t quilt a design in the red inner border, but I did stitch in the ditch along both seamlines. Then, in the black outer border, I selected a quilting stencil that mimicked the design in the fabric and marked the design using a chalk pounce. When using a stencil, you’ll probably have to adjust the space between the motifs in the stencil so the design will fit properly. Instead of marking the entire design, I place the stencil in one corner on the border and make a registration mark at the end of the stencil. Then, I move the stencil, align the mark, and made a registration mark at the other end of the stencil. I continued in the same way until I reach the opposite corner.
If the design needs to be a bit shorter, when marking the design, I shorten the distance between a few of the motifs until it fits properly. If the quilting design needs to be a bit longer, I make the distance between a few of the motifs a bit farther apart. By spreading out the adjustment across the entire length of the design, the adjustments will be less noticeable. After marking about half of the design, I stop and make registration marks again to make sure the design will fit, then I make further adjustments if needed.


“Lincoln’s Delight” from Love of Quilting January/February 2016 also has an inner and outer border. However, on this quilt, I chose one of my go-to border designs for the inner border. The continuous loop design is quick to stitch and can be easily adjusted to fit any border. For the outer border, I repeated the ribbon candy quilting design that I quilted in the blocks.

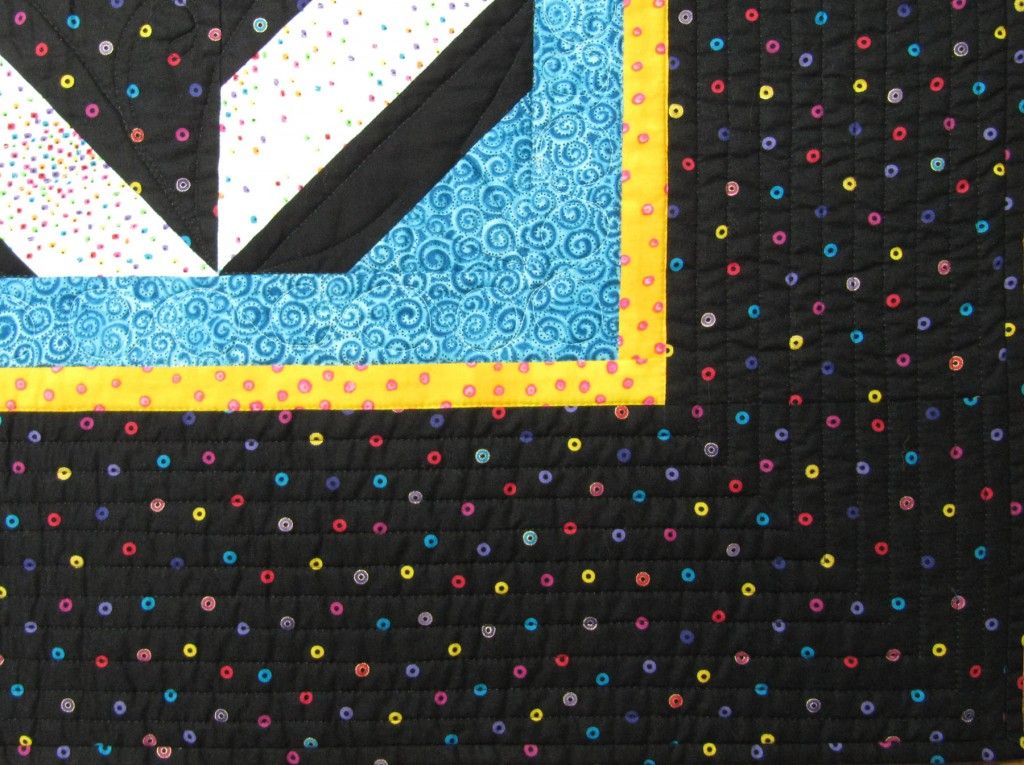
And last, but certainly not least, let’s talk about choosing a quilting design for pieced borders. When quilting pieced borders, I want to enhance the piecing. But, I still ask myself the same five questions listed earlier. Since there are a lot of straight lines in “Electric Blue” from Love of Quilting March/April 2015, I used curved lines in the border triangles to offset the straight lines. Notice that I treated the white inner and pieced outer borer as one border, and extended the quilting across the inner border. I also used white thread in the white areas and blue thread in the blue areas.


The same three tips for choosing the right machine quilting designs for your quilts from Choosing Quilting Designs, Part 2, applies to choosing the right quilting design for borders. I encourage you to practice free motion quilting. If you don’t like to practice, make a simple quilt and “practice” your free motion quilting on a quick project. Then, bind the quilt and give it away.
One more tip: use a busy print on the back. I often use a busy print on the back because I like to change my thread color to match the fabric on the front. By using a busy print on the back, the different thread colors, and any irregular stitches, are less noticeable. And, don’t worry about everything being perfect, those little imperfections are signs of a handmade quilt!
Happy Quilting!
Nancy


Join the Conversation!