PIGS: Machine Applique Hints and How-to’s | McCall’s Quilting Blog
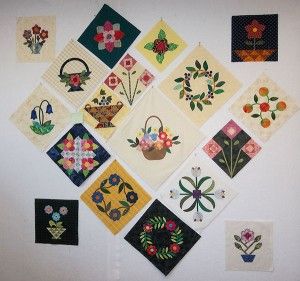
In my last blog about PIGS (Projects in Grocery Sacks), I showed this photo of orphan blocks that all feature applique. I decided rather than use them to make small projects, I’d put them together to make a quilt.
I found several more blocks that would work in an applique sampler quilt. Most of the blocks are meant to be set on point but some cannot be. I’ll figure out that part later in the process.

And now there are more.
Once I had all the possible blocks located, I started working on them. Some are hand appliqued, some are machine appliqued, and some are just fused but not stitched at all. If this were to be a wall quilt, that would be fine but for a quilt used on the bed, the applique needs to be stitched down for durability.
To prep the blocks for stitching down the applique by machine, I press them using spray starch generously. I mix my own starch from concentrate, using equal parts of concentrate and water. I put it in a spray bottle, then spray and press several times until the block is truly stiff. Sometimes this starch step is all you need to do to stabilize your block.
The two stitches I use most often are satin stitch and blanket stitch.
I use the needle down and the presser foot lift functions so if I stop, the needle stays in the fabric, the presser foot lifts and I can move the fabric to the correct position and start sewing again without having to take my hands away from the fabric.

Satin stitch
This orphan block was a step-out that my friend Karla made. She printed a photo of a daylily on fabric then added a layer of yellow fabric in the shape of the flower. She had started stitching it down with satin stitch so that is how I completed the applique. I matched my stitch width to hers so it is very narrow (2mm). My thread color doesn’t match but I don’t think it will be objectionable when I get the whole thing put together.
When I set up my machine for satin stitch, I generally use a very short (.5 or .6mm) stitch length and medium (5-6mm) width setting for the zigzag stitch. A wider stitch means you don’t have to sew quite so straight but generally a narrower stitch looks a little nicer. I do have to tell you that I seldom use a satin stitch for machine applique. I think it is harder to get a professional looking end result. Little mistakes are more noticeable than they are with a blanket stitch.
")
Blanket Stitch (I still have two flowers to stitch.)
For the blanket stitch, I usually use a width of about 2mm. There are several different blanket stitches in current machines so you just need to play with the width and length of the stitch and see what looks nice to you. The straight part of the stitch should be on the background fabric right at the edge of the applique. The “bite” goes on the applique and ideally is at a 90-degree angle from the edge of the applique.
Practice a bit on a test block so you can turn corners nicely. Stop with the needle down on the outside edge of the curve. If the curve is going to the left, stop with the needle in the left position and vice versa. That way the outer edge of the curve is nice and smooth. In most cases, it’s better to make several small adjustments to the direction you are stitching, rather than one large adjustment.
It’s important that the blocks stay flat with no tunneling. Tunneling is when the sideways part of a stitch pulls the fabric together. Here’s an example.

Tunneling
Do you see how the fabric is puckered under the stitching? It doesn’t look like much but if there are several rows of stitching on one block with tunneling happening, those puckers would take away from the finished size of the block and that creates a whole new set of problems.
The answer to the tunneling issue is stabilizer. If the spray starch used to prep the block isn’t enough to prevent tunneling, add a layer of stabilizer. I generally use Sulky Tear-Easy. Stitch a test block and add stabilizer until no tunneling occurs. It may take more than one layer. Stitch a couple of inches on your sample block and if there is even a hint of tunneling, add another layer of stabilizer. Do remember when you remove tear-away stabilizer to be gentle and to support the fabric so you don’t distort the fabric as you are pulling it away.
My friend, Sara Gallegos teaches more completely about machine applique on QNNtv’s My First Quilt here, here and here if you’d like to check it out.
I can hardly wait to finish the applique and start putting this quilt together. It’s going to be awesome. And it’s all PIGS, just orphan blocks that were stuffed away in the closet.
Happy quilting!


Join the Conversation!